Troubleshooting/Common Problems
Use the sidebar to navigate to the question/answer you need.
Couldn't solve your problem? Ask us on Discord or GitHub.
The plugin isn't enabled, what do I do?
If you are running Minecraft 1.21.8 or higher, you need to use a Paper server. Spigot is no longer supported by the plugin.
How do I get rid of ghost TARDIS display blocks and lights?
You need to use the /kill command to remove ghost blocks (while standing next to the display):
- for blocks, lights and regeneration models use the
/kill @e[type=item_display,distance=..2]command - for interactions use the
/kill @e[type=interaction,distance=..2]command - you might need to use F3+B to show entity bounding boxes to check for these - for text displays use
/kill @e[type=text_display,distance=..2]
You can also use /tardis update remove_displays to remove all item display blocks from ALL rooms in your TARDIS and replace them with the block defined by the player's wall preference.
I made a stack of blocks but the TARDIS does not materialise
The method for creating a TARDIS was changed in version 2.6, you should craft a TARDIS seed block instead. Check the ‘Creating a TARDIS’ page for details.
When I click the TARDIS seed block with a stick nothing happens
You didn’t read and follow the instructions — you need to click the seed block with the TARDIS Key — the key is only a stick if you have configured it to be one. Check the ‘Creating a TARDIS’ page for details.
The plugin says ‘You cannot grow rooms unless your TARDIS was created in its own world’
You need to set up the plugin to so that when you create a TARDIS, it is created in its own world, or in a special world called TARDIS_TimeVortex. To do this you need follow the instructions for “My TARDIS is not generating its own world!” below, or go to the Time Vortex page.
I made a room and it grew inside the TARDIS!
Things have changed quite a lot with the update to TARDIS v2.6, especially the way that you grow rooms
- make sure the plugin is up to date
- read all the change logs for the various 2.6 versions
- stop the server
- delete plugins/TARDIS/schematics and plugins/TARDIS/rooms.yml
- start the server
- delete your old TARDIS
- make a new TARDIS
- use ARS to grow a new room
I try to grow a room but the plugin says “There seems to be a block in the way! You should be growing out into the void...”
Read the answer above, once you’ve done that (and you still want to grow a room manually) make sure the room you are growing from contains a pressure plate in the correct position for the piston door, then place the seed block in the right place — i.e. NOT in the wall.
My TARDIS is not generating its own world
For best results, follow these steps to set up the plugin to create TARDIS worlds:
- Remove all current TARDISes by breaking the Police Box sign
- Stop the server
- Delete the
plugins/TARDISfolder - Install TARDISChunkGenerator (if necessary - v4.14.0 and below)
- Make sure that the TARDIS config option
create_worldsis set totrue. - Start the server
- Create a TARDIS
How do I import my TARDIS world into my multi-world plugin?
You should never do this. The TARDIS plugin can manage its own worlds.
Non-op players can’t break the blocks inside the TARDIS to grow rooms
This is probably because of Minecraft’s built-in spawn protection. The server admin will need to
set spawn-protection=0
in server.properties (and set up their normal world spawn with another form of protection instead e.g. WorldGuard).
My Handbrake is not re-engaging!
To re-engage the handbrake you must LEFT -click the lever.
If you are stuck in the Time Vortex, use the /tardistravel stop command to rebuild your TARDIS before trying to travel
again.
It says circuits are missing from the Advanced Console.
You haven’t crafted the appropriate circuit and placed it in the TARDIS Advanced Console (the JUKEBOX).
Solution 1: Craft the circuit!
Solution 2: Give yourself the circuits! /tardisgive [your name] kit circuits
Solution 3: Set the TARDIS difficulty level to easy — circuits are not required in easy mode.
It says I need to use the Advanced Console
This is probably because the TARDIS difficulty level is set to hard. On hard difficulty, most travel commands are
disabled, and you must place the appropriate storage disk into the Advanced Console instead. See the
Advanced Console page for more information.
You can also use the /tardisconfig difficulty easy command to switch difficulty levels and re-enable the commands.
My TARDIS isn’t charging at a recharge beacon
You must time travel to the recharge location.
Charging is triggered by players actually travelling to the recharge point, not remotely bringing their TARDIS into
position with the /tardis come_here command.
I can’t hear the custom sound effects
The custom TARDIS sound effects require you to have the TARDIS Sound Resource Pack installed in the Minecraft client, and that you are running Minecraft 1.7.x or higher.
You can download the resource pack from GitHub: https://github.com/eccentricdevotion/TARDIS-SoundResourcePack — take note of installation instructions on that page.
It says I’m still inside the TARDIS, but I’m not
This happens if you have exited the TARDIS by some other way than the TARDIS door — this could be because of death, call, teleport, Multiverse teleport, or server crash.
To fix this, type the command:
/tardis occupy
It keeps saying I’m restricted to the [] area or something about my exile status!
Please read the first part of the Permissions page.
I changed some config options but they keep changing back!
If you manually edit the TARDIS config file while the server is running, you will need to use the /tardisconfig reload
command (DO NOT use /reload as the plugin saves the current settings when it is disabled).
The better option is to set the config options in game with the /tardisconfig [config option] [value] command — changes take effect immediately, no server restart required. See the Config Commands page for more details.
I jettisoned a room and it deleted part of the control room!
The /tardis jettison command relies on the direction the player is facing in order to work — always face into the
room you want to jettison , otherwise you are likely to be removing parts of your TARDIS that you don’t want to.
I edited the config file, but when I reload the changes don’t save!
This is fairly standard behaviour for plugins. The currently loaded config options are saved when you restart the server, and the new ones you put in are overwritten.
You have three options:
- Use the the TARDIS config commands to change the options i.e.
/tardisconfig [config option] [value]for example/tardisconfig key CARROT— the benefit is that changes take effect immediately, you don’t need to restart the server. Refer to the config commands page. - Manually edit the file, save it, and use the
/tardisconfig reloadcommand to load your changes into the server’ memory. - STOP the server. Edit the config file, save it, then start the server.
It is generally not good practice to use the /reload command.
The perception filter has gone completely invisible!
When travelling between worlds, the Perception Filter may sometimes go completely invisible — if this happens, just press your “sneak” key (usually LEFT-SHIFT) to make the player skin update.
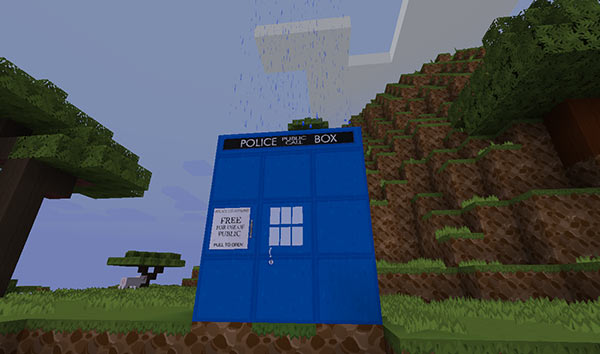
Why does it rain on my TARDIS in dry biomes?
This is due to a residual temporal flux causing the immediate TARDIS environment to be out of sync with the rest of the multiverse — nothing the TARDIS perception filter can’t handle!
In reality, you have police_box.set_biome: true in the config. This sets the biome of the TARDIS location to DEEP_OCEAN,
so that players with Optifine modded clients and the
TARDIS-Resource-Pack will see a groovy looking
TARDIS — the result is that it sometimes rains on the Police Box.
Why does my TARDIS door open when I crouch-click it (and get out of sync with the other door)?
You probably have the LWC plugin installed. LWC has a setting that allows iron doors to be opened by clicking them. You should disable this in LWC’s doors.yml:
# Enable the opening of Iron Doors when you click on them
    enabled: false
If you move the interior TARDIS door, remember to remove the LWC protection after placing the door in its new position (and before running the /tardis update door command.
What is the Resource Pack in the videos?
An unreleased (and unfinished — still most of the mobs to do) pack called Bromley Massive Vector, also by eccentric_nz. Maybe, one day he will finish it. It’s [128X], and is compatible with Minecraft 1.19+.
If you **really** need it, the pack is available here: https://github.com/eccentricdevotion/Bromley-Massive-Vector — take note of installation instructions on that page.